AI development course #beginner A1

When people in this forum discuss AI ethics, consciousness, self-awareness, and related topics, I often notice a lack of basic technical understanding.

So, I thought: Why not start a beginner-friendly course right here?

The idea is to create a simple, step-by-step journey that helps everyone - even absolute beginners - gain some foundational knowledge. Together, we’ll explore how things actually work, identify what’s potentially risky when using AI, and have fun along the way.

I encourage all the regulars and experienced developers in the OpenAI Community to join in. Please feel free to add your insights, correct me if I’m mistaken, or just share your expertise - it’s impossible for any single person to know everything!

Here’s how it will work:

  • I’ll post small tasks and give you hints or directions every day.
  • You can ask questions, show your results, or simply follow along at your own pace.
  • Our assistant, ChatGPT, will be here to help us out whenever needed.

By the end of this beginner’s journey, you’ll have built your own simple chat using the OpenAI API.

Happy coding, everyone!

19 Likes

So we are going to start by getting us a so called IDE - basically a program like a text editor but for coding.

There are others, but since this one is free and works on Windows, Linux and Mac and since it makes sense that we all use the same one - unless you are not already coding with another IDE I suggest you proceed by downloading and installing this program here:

Then we are also downloading and installing a tool called git - which will give the windows developers a nice little terminal so we can add that to our IDE.
I wasn’t using windows for some years and the last time I was building code on a mac was also maybe even a decade ago - so excuse me if I miss something (we are not using windows subsystem or chocolatey any time soon though).

If you got problems installing git on your machine ask ChatGPT with the following prompt: “I want to install git on my computer. I am using windows” (replace windows with your actuall operatring system).

And then - only on windows - you need to add the terminal of git (so called git bash) to VSCode.

Use this prompt for that: “How do I add the git bash to vscode?”

When everything is done you should be able to open VS Code, then click this icon:

which will open the terminal in the bottom of the IDE

And type this:

git -v

The version of your git might be slightly different - but as long as it prints something like that:

Screenshot from 2025-03-09 00-29-55

you’ll be fine.

3 Likes

wow this looks all complicated…

And a lot of extra baggage… Why not just code this in PHP in a text editor?

ok I got your other message…

I will follow along and see what you have to say

ok so back up here…

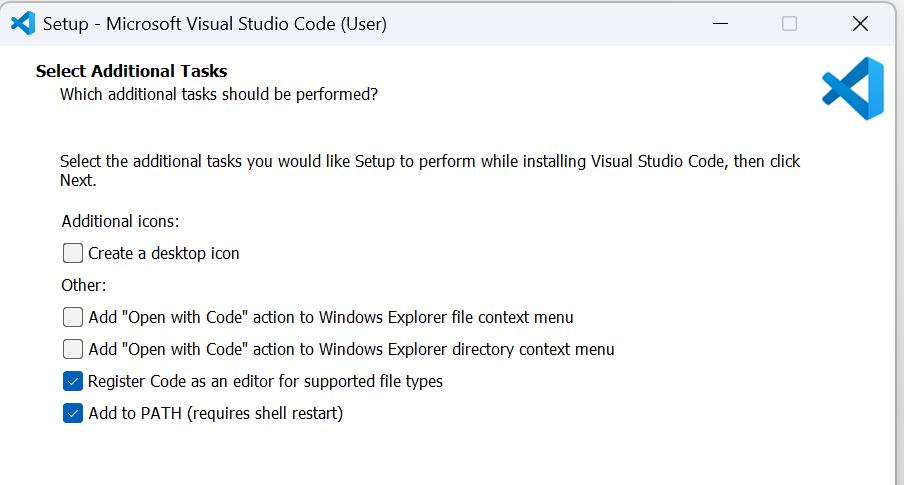
Am I just selecting all default options?

I am about 5 options in already on setup and confused

(I would be looking to use WampServer, la plate-forme de développement Web sous Windows - Apache, MySQL, PHP in this instance)

Well, when you check “create a desktop icon” you will get an icon on your desktop. Do you want that or do you want to open it later by pressing the windows key and start typing “c”, “o”, “d”, “e” and then click it.

I would select all 5 if you really want it to be convenient.

1 Like

I agree that it is possible using PHP - but why not be a little bit more open?

Let’s first do it in Python and when we finish the basic stuff we can continue with the expert stuff in PHP (where we would use a framework like symfony and configure that for some weeks and then use mercure to push messages of the chat to the frontend).

Let’s use Python for now. Python is for beginners.

But till we get there that will be a few days!

1 Like

I’ll just follow your lead :slight_smile:

1 Like

Next step is “create a github account”.

@jochenschultz You said in another topic

So we can somehow help GPT remember all previous chats using ChatGPT API?

2 Likes

Yep, that’s what we are going to build here.

I mean I can build that in a few hours. But this is more to understand how it works than me building that thing.

But when you follow it you can build it… should take 2 weeks at most.

1 Like

Great, I have VScode and git installed, waiting for others to join in, and ready for the next steps. :slight_smile:

1 Like

Github Account?

There is one more thing to install:

Docker including Docker Compose.

Ask ChatGPT how that works.

Yeah, GitHub account is ready and Docker seems to be working fine (linux).

1 Like

I’ll log in too. As promised, I’m here.
I’ve gone through every step, ready for the next lesson…

1 Like

Thanks for joining and following.

Well, now we just need to take a few more steps until we are able to write some code and publish it on github. To do so we need to make sure our freshly installed “git” programm can communicate with the git server.

Wait what? Publish code to the public? Store code somewhere?

Yep :slight_smile: It is not really neccessary to do that. But we want to be able to share code examples.
If anything doesn’t work you can just upload the code to github and someone from this course e.g. me can look into it.

This sounds complicated af!

I agree, but the following steps really make our life easier in the upcoming coding sessions!

So, our local git program needs to be able to communicate with github.

Let’s ask ChatGPT how we can achieve that:

hey chatty,

I want to connect my local git to github. What do I need to do? My operating system is windows and I have git installed and I have a freshly created github account.

Give it to me in a role play mode where you first show me the next step and then wait for my reponse until we have our first repository created and checked out to our local machine.
Do not leave that mode unless I explicitely tell you to do so.

For that I also want to suggest me where to store the code locally.

Thanks mate, I am waiting for your first step.

5 Likes

Todays task is to install docker on your machine.

For that I would like you to find out by yourself how to do that.

Then, when you’ve done that please post the solution here.

We need one for windows, one for linux and one for mac.

A generative pretrained transformer AI engine has limits. It does not itself “remember”, as its context is reset after every usage.

Stateless AI large language models inherently have a limitation of the amount of input that can be provided, upon which a response is based, which is called a context window, a temporary combined memory area for continuing output based on an input. Within that, there is also limitation of how much can truly be understood overall, with reward-trained attention focusing on what parts of input would be most important for answering.

The cost of this input also increases linearly when billed.

You give the illusion that the AI is remembering by giving previous chat exchange messages, leading up to the latest new input.

Therefore, you will need to use your own techniques of chat truncation, and optionally use advanced layers of retrieval sourced from topical old chat, searching to give the impression of an AI that does not forget, for the purpose of cost management and quality and to not exceed a particular model’s limitations. This level of programming is a bit beyond “install a version control system if you instead need a console” advice.


AI development tip: Using API AI language model services costs money billed by the data usage of every API call at a model’s rate. Think about these costs when considering feasibility.

AI development tip #2: client applications must never make API calls directly to OpenAI, as that allows the discovery of your API keys used in software and network requests. Unless a private local bring-your-own-key application for other developers, you must have a backend service that handles user accounts, stores this memory of chat sessions for users, and handles client software requests.

AI development tip #3: be a programmer already, thinking logically about problems and algorithms to solve them.


OpenAI’s API Quickstart, linked https://platform.openai.com/docs/quickstart

1 Like

Yes, that’s what this course is about. Not exactly the beginners course. But at level A3 we will have something that uses and Orchestrator to analyse the last chat input and retrieve context from a combined solution using VectorDB, GraphDB, RDBMS and a filestorage (so this is also usable in company context).

So cost to run that thing is conciderably low and depends on your daily chat volume. I would assume somewhere around 17-33 $ per day for a perfect solution (when we use previous chat messages to finetune/posttrain the model). The cost coming from services you might need to use for example renting a computer with a large GPU. I don’t ask for anything here.

But on our way to the perfect solution we will also test simple solutions that can at least extend the context for example by just summarizing older messages or use a technique called nth token compression.

And we will also go deeper into analysis and neuromorphic computing in the more advanced courses… where we also talk about ethics…

And this course will make sure that you can become one (not you personally obviously @_j - I mean I appreciate your input)

1 Like

Okay, I use Fedora Linux, so this solution should work for dnf-based distros. For others, steps 1-2 will be different.
Also it’s all neatly described in the official manual: Fedora | Docker Docs or you can ask your GPT.

  1. Set up the repository
    Install the dnf-plugins-core package (which provides the commands to manage your DNF repositories) and set up the repository.
sudo dnf -y install dnf-plugins-core
sudo dnf-3 config-manager --add-repo https://download.docker.com/linux/fedora/docker-ce.repo
  1. Install Docker Engine (It includes Docker Compose)
sudo dnf install docker-ce docker-ce-cli containerd.io docker-buildx-plugin docker-compose-plugin

This command installs Docker, but it doesn’t start Docker. It also creates a docker group, however, it doesn’t add any users to the group by default.

  1. Start Docker Engine.
sudo systemctl enable --now docker

This configures the Docker systemd service to start automatically when you boot your system. If you don’t want Docker to start automatically, use sudo systemctl start docker instead.

  1. Make sure that both docker and docker compose are installed by checking their versions:
docker --version
docker compose version
  1. Verify that the installation is successful by running the hello-world
    image:
sudo docker run hello-world

This command downloads a test image and runs it in a container. When the container runs, it prints a confirmation message and exits.

You have now successfully installed and started Docker Engine.

1 Like

so does this work now on your machine?